The OneDrive sync client is now installed on all University Lab PCs. This service ensures that the work you do on a University PC is saved to your OneDrive file store in the cloud. It’s important that you familiarise yourself as to how the OneDrive sync client works and what to do in the event of issues.
The OneDrive sync client ensures that when you save documents they are “synced” to your University OneDrive file store in the Microsoft cloud. On University PCs the client has also been configured to sync documents you save in the Documents, Desktop and Pictures folders to your OneDrive file store.

The OneDrive sync client has also been configured to use the “files on demand” service. This service ensures that only the files that you are working on are synced from your OneDrive file store to the computer you are working on and makes for a much faster experience when you access your documents via OneDrive.
When you first open file explorer you will see a cloud icon next to all your files and folders. This icon indicates that a file hasn’t yet been downloaded to the PC.

Only the files you are current working on will be synced to your PC, a green tick will appear next to the file to show this:

This icon in the bottom right of the screen shows the sync status of all your files stored in OneDrive. A static blue cloud means that all your files that you are currently working on are synced to your one drive file storage. If you are working on a non-Microsoft application, please save your work and then close the application and the sync will begin. You should wait for the sync to complete before logging off.

If the icon has changed to this it is in the process of syncing any files you have been working on.

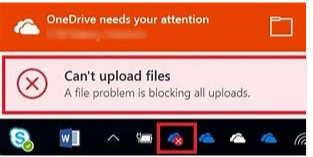
If you have an issue, the icon will remain as this  and, when you can right click on the icon, you will see a Red tile with a message saying OneDrive needs your attention. A message box like the one below will be displayed. Click on the OneDrive icon and the resolution area will be displayed.

If you follow the suggestions in the Resolution section, the file will then upload.


